Azure App Service is a fully managed, scalable PaaS (Platform as a Service) offering from Microsoft Azure Cloud for deploying web apps, APIs, and Mobile Apps with a wide range of frameworks supported.

This article will guide you through a step-by-step process for deploying and hosting your MERN stack web application to the Azure App Service by creating a Docker image, pushing that image to ACR (Azure Container Registry), and then automating the entire process with GitHub Actions CI/CD pipeline.
Steps to Deploy your MERN Stack Web Application:
NOTE: There are various ways to organize your codebase, but in this article, we will focus on the scenario where the frontend and backend are maintained in separate repositories. If your setup differs, such as a monorepo or a single repository with intermixed frontend and backend code, you'll need to adjust the Dockerfile and GitHub Actions workflow accordingly to fit your project's structure
Prerequisite
Before proceeding, ensure you have the following:
Step 1: Containerize Your MERN Application
Create a Dockerfile in the root of your project repository and push this Dockerfile to the respective GitHub repository.
Here is the sample Dockerfile for your Frontend (Reactjs) codebase
FROM node:18-alpine AS build-prod
WORKDIR /app

COPY package*.json ./
RUN npm install --legacy-peer-deps
COPY . .
RUN npm run build

EXPOSE 3000
CMD ["npm", "start"]
And here is the sample Dockerfile for your Backend (Nodejs) codebase
FROM node:18-alpine AS build-prod
WORKDIR /app

COPY package*.json ./
RUN npm install --legacy-peer-deps
COPY . .

EXPOSE 8080
CMD ["npm", "index.js"]
Key Points:
Base Image : The node:18-alpine image is a lightweight Node.js runtime, ideal for production environments.
WORKDIR /app : Setting the working directory inside the container.
COPY package*.json ./ : Copy the package.json and package-lock.json files into the container.
RUN npm install --legacy-peer-deps : Install dependencies while handling potential legacy peer dependency issues.
COPY .. : Copy the rest of the application code into the container.
RUN npm run build : Build the React application for production so you don't have to make your application locally every time for any new change. Alternatively, you can develop your react code in your GitHub actions pipeline.
EXPOSE 3000 / 8080 : Expose port 3000 (React) / 8080 (Node) to allow external access to the container.
CMD ["npm", "start"] / CMD [ "node", "index.js" ] : Start the frontend/backend application server.
Step 2: Create your ACR (Azure Container Registry)
Now, we will create a container registry into which we will push our above-containerised application
In Azure's Home Dashboard, search for Azure Container Registry and click the Create button.
Select your Subscription and Resource Group. Create a new one if you don't have one already.
Enter your Registry name and desired Location, and select the Price plan per your requirement.

Configure your Networking, Encryption and Tags as per your organization's defined rules and click on the Review + Create button to create your Container Registry 🎉
Step 3: Build and Push your Dockerised Codebase to the ACR
The following commands will be the same for both the frontend and backend codebases. Run all these commands in the terminal of your local machine:
Build Docker Images
Navigate to the directory of the codebase and run the following command:
docker build -t YOUR_ACR_NAME.azurecr.io/YOUR_REPOSITORY_NAME:YOUR_TAG_NAME .Log in to Azure Container Registry
Use the Azure CLI to log in to your ACR:
az acr login --name YOUR_ACR_NAMEAlternatively, you can also log in via Docker
docker login YOUR_ACR_NAME.azurecr.ioPush Docker Images to ACR
Push the code image to the ACR:
docker push YOUR_ACR_NAME.azurecr.io/YOUR_REPOSITORY_NAME:YOUR_TAG_NAMEKey Points:
YOUR_ACR_NAME: Here, you have to write the name of your Azure Container Registry that you have created in Step 2
YOUR_REPOSITORY_NAME: This could be any name you want to assign to that containerised image, let's say I build the frontend code image, so I defined my repository name as frontend. Similarly, you can keep the repository's name per your organization's convention.
YOUR_TAG_NAME: Again, you can assign any tag, let's say v1, v2 or follow your organization's defined rules.
Step 4: Create an Azure App Service
Now, we will create an App Service to deploy your containerised application:
In Azure's Home Dashboard, search for Azure App Service and click the Create button.
Click on the Create >> Web App button.
Select your Subscription and Resource Group. Create a new one if you don't have one already.
Provide your Instance Name and select Container as a Publish option because we use ACR to publish our code.
Select your OS and Region per your organization's requirements and click Next.

Configure your Database if required. In this case, we use MongoDB as our database, so we can skip this section and click the Next button.
In the Container section, select Azure Container Registry as your Image Source.
Now, select your Registry, the image you created and its Tag from the dropdown given.
Provide the startup command (Optional)

Configure your Networking and Monitoring according to your organization's rules, then click the Review + Create button to create your Web App.
Step 5: Setup your GitHub Actions Pipeline
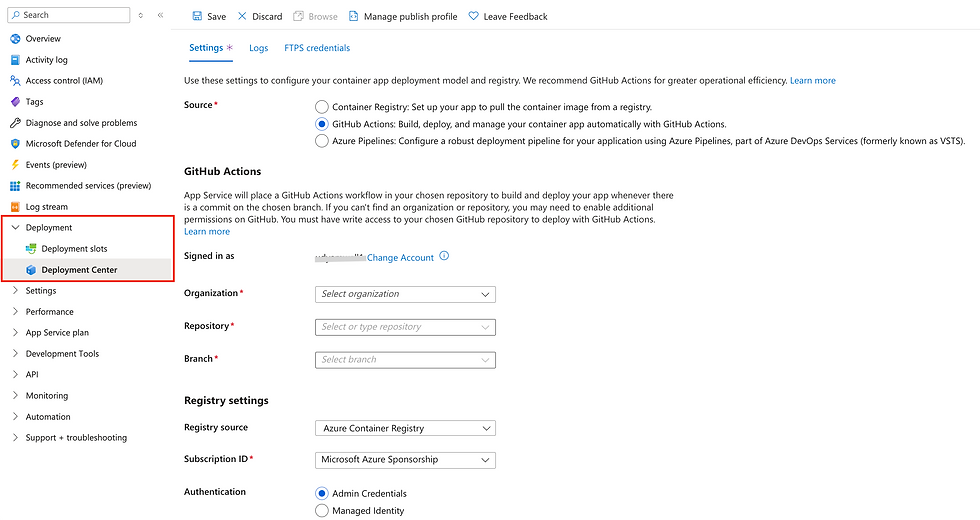
For the final step, we will set up the GitHub Actions pipeline with the code repository to automatically build, deploy, and manage our container app.
Go to your created Web App >> Deployment >> Deployment Center.
Select GitHub Actions as your Source.
Now, select the organization, repository, and branch of your code repository that you want to deploy.
Note: Keep the Regsitry Source as Azure Container Registry

Click on the Save button and go to your GitHub repository. You will find a folder: .github > workflows > main.yml. Here is a sample workflow file. You can also edit it as per your requirements:
# Docs for the Azure Web Apps Deploy action: https://github.com/Azure/webapps-deploy

# More GitHub Actions for Azure: https://github.com/Azure/actions

name: Build and deploy container app to Azure Web App
on:
  push:
    branches:
      - main
  workflow_dispatch:

jobs:
  build:
    runs-on: 'ubuntu-latest'

    steps:
    - uses: actions/checkout@v2

    - name: Set up Docker Buildx
      uses: docker/setup-buildx-action@v2

    - name: Log in to registry
      uses: docker/login-action@v2
      with:
        registry: https://YOUR_REGISTRY_NAME.azurecr.io/
        username: ${{ secrets.AzureAppService_ContainerUsername_0bb4lkkj3f7 }}
        password: ${{ secrets.AzureAppService_ContainerPassword_47beca4331e }}

    - name: Build and push container image to registry
      uses: docker/build-push-action@v3
      with:
        push: true
        tags: YOUR_REGISTRY_NAME.azurecr.io/${{ secrets.AzureAppService_ContainerUsername_0b38823c3f7 }}/YOUR_REPOSITORY_NAME:${{ github.sha }}
        file: ./Dockerfile

  deploy:
    runs-on: ubuntu-latest
    needs: build
    environment:
      name: 'production'
      url: ${{ steps.deploy-to-webapp.outputs.webapp-url }}

    steps:
    - name: Deploy to Azure Web App
      id: deploy-to-webapp
      uses: azure/webapps-deploy@v2
      with:
        app-name: 'YOUR_WEB_APP_NAME'
        slot-name: 'production'
        publish-profile: ${{ secrets.AzureAppService_PublishProfile_23c06cb849 }}

        images: 'udyamwell.azurecr.io/${{ secrets.AzureAppService_ContainerUsername_0b8823c3f7 }}/YOUR_REPOSITORY_NAME:${{ github.sha }}'
Congratulations 🎉 🎉
You have deployed your entire codebase to the Azure Web App Service using Azure Container Registry and automating it with the GitHub Actions pipeline.
Conclusion
Deploying a MERN stack web application to Azure App Service via GitHub Actions is an efficient and scalable way to host your web application. The development and deployment workflow can be streamlined by containerizing the frontend and backend, using Azure Container Registry (ACR), and automating deployment with GitHub Actions.
Depending on your project's requirements, you can extend this foundation to include monitoring, load balancing, and even multi-region deployments. Take the next step and implement advanced Azure services such as Azure Monitor for observability and Azure Key Vault for secure secret management.
FAQs
Can I use a single repository for both the frontend and backend instead of separate repositories?
Yes, you can. If you are using a mono repo, you’ll need to adjust your Dockerfile and GitHub Actions workflow to accommodate the combined structure of your codebase.
Is it mandatory to use Azure Container Registry (ACR)?
While ACR is recommended for better integration with Azure services, you can use other container registries like Docker Hub. Ensure your Azure App Service is configured to pull from the chosen registry.
Can I deploy the MERN stack application without using Docker?
Yes, Azure App Service supports non-containerized deployments. However, containerization offers better portability and control over your runtime environment.
What if I want to deploy a database along with my application?
Azure offers services like Azure Cosmos DB and Azure SQL Database. You can integrate these services with your MERN stack by provisioning them separately and connecting them through environment variables in your code.
How do I manage secrets like ACR credentials and publish profiles securely?
Use GitHub Secrets to store sensitive information. Reference these secrets in your workflow files to ensure secure and seamless integration.
.png)
Comments