.png)
Overview:
This article delves into integrating Apache Kafka with Java Spring Boot, focusing on creating API endpoints for Kafka. It guides you through building APIs that leverage Kafka for efficient real-time data processing. By the end, you’ll understand how to construct a reliable Apache Kafka API, facilitating seamless communication and data streaming in your applications.
Introduction to Apache Kafka?
It is a distributed streaming platform vital in decoupling services and asynchronous communication. It is scalable, provides high throughput, supports real-time processing, and ensures data persistence. We should know some critical points before building an API endpoint for Kafka.
Producers: Applications that send a message from Kafka
Consumers: Applications that read messages from Kafka
Partition: A queue that maintains ordering within itself
Broker: Server that hosts partitions
Topic: Group of partitions form topic
Record: A column in partition
Consumer group: A group subscribing to a topic to read messages.

Getting Started with Kafka
To build an API endpoint for Apache Kafka using Java Spring Boot, you can follow these steps:
Step-by-Step Guide to Setting Up Kafka on Localhost
Step 1: Download the latest Kakfa from here

Step 2: Extract the downloaded Kafka and cd into the Kafka folder
tar -xzf kafka_2.13-3.7.1.tgz
cd kafka_2.13-3.7.1
Step 3: Start the zookeeper service
bin/zookeeper-server-start.sh config/zookeeper.propertiesStep 4: Start the broker service
bin/kafka-server-start.sh config/server.propertiesStep 5: Create a topic
bin/kafka-topics.sh --create --topic <topic_name> --bootstrap-server localhost:9092
Here, the name of the topic is quickstart-events
Step 6: Start the producer
bin/kafka-console-producer.sh --topic quickstart-events --bootstrap-server localhost:9092Step 7: Start the consumer
bin/kafka-console-consumer.sh --topic quickstart-events --from-beginning --bootstrap-server localhost:9092
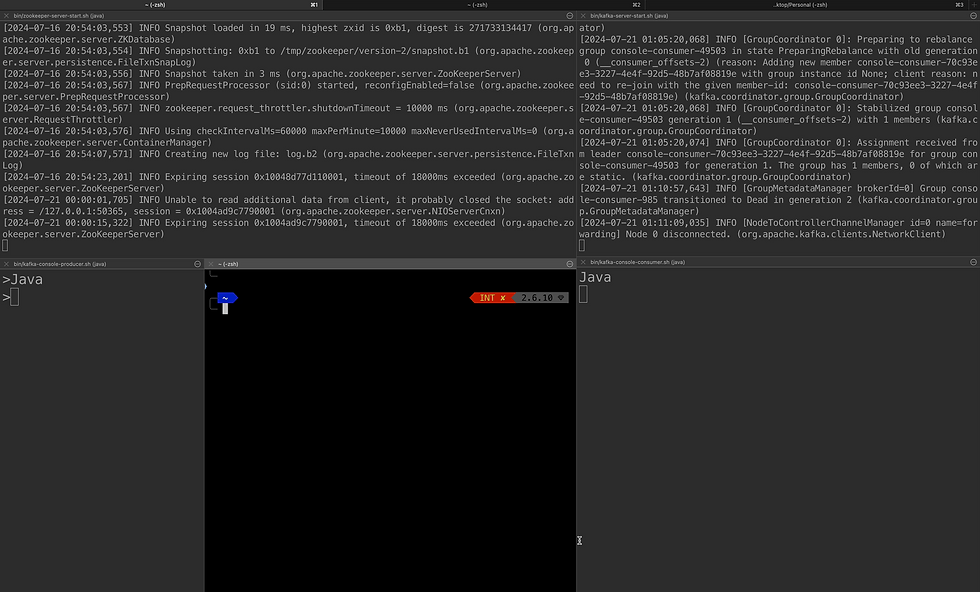
Once the producer and consumer are started on localhost, you can notice that every message written in the producer section will be visible in the consumer section after hitting ENTER, as shown below.

Building API Endpoints for Apache Kafka with Java Spring Boot
Step 8: Start the spring boot project. Go to https://start.spring.io/, enter the name for your desired project, and add the following dependencies :
Spring Web
Lombok
Spring for Apache Kafka
Spring for Apache Kafka Streams
and hit GENERATE

Step 9: Unzip the downloaded file, open it in your desired IDE (preferably IntelliJ) and start coding.
Make folders as controllers, services and models and create classes and interfaces as shown.
KafkaController class (in controllers folder)
@RestController
@RequestMapping(value = "api/v1/kafka")
public class kafkaController {

    @Autowired
    private KafkaService kafkaService;

    @PostMapping("/produce")
    public KafkaResponse produceRequest(@RequestBody final 	 KafkaRequest kafkaRequest) {
        return kafkaService.produceRequest(kafkaRequest);
    }
}
IKakaService class (in services folder)
@Service
public class IKafkaService implements KafkaService {

    private String TOPIC = "quickstart-events";

    @Autowired
    private KafkaTemplate<String, String> kafkaTemplate;

    public KafkaResponse produceRequest(final KafkaRequest kafkaRequest) {
        String message = kafkaRequest.getMessage();
        kafkaTemplate.send(TOPIC, message);
        KafkaResponse kafkaResponse = KafkaResponse.builder()
                .success(Boolean.TRUE)
                .message("message consumed successfully")
                .build();
        return kafkaResponse;
    }
}
KafkaService interface (in services folder)
public interface KafkaService {
    KafkaResponse produceRequest(final KafkaRequest kafkaRequest);
}
KafkaRequest class (in models folder)
@Data
@Builder
@NoArgsConstructor
@AllArgsConstructor
public class KafkaRequest {

    private String message;
}
KafkaResponse class (in models folder)
@Data
@Builder
@NoArgsConstructor

@AllArgsConstructor
public class KafkaResponse {

    private Boolean success;
    private String message;
}
Import all the required classes in each file. You can find the exact code for this in this GitHub repo :
Testing Your Kafka API Endpoints
Step 10: After you have written all the required code for your project, it's time to run and test the application. Before running the application, execute this command.
mvn clean installThis usually deletes previous build artefacts, compiles the code, runs tests, packages it, and installs the package into the local Maven repository.
Step 11: Now, go to the Application file of the project and run it by clicking a play button on the top right corner

Step 12: Hit the API that we have just written for Kafka producer or just copy-paste this given curl below in the terminal and hit ENTER
curl --location 'localhost:8080/api/v1/kafka/produce' \
--header 'Content-Type: application/json' \
--header 'Cookie: __profilin=p%3Dt' \
--data '{
    "message": "DevRelSquad"
}'
After successfully running the application and executing this curl, you'll notice that the message provided in curl parameters is now showing in the consumer section of the terminal .

Conclusion: Integrating Apache Kafka with Spring Boot:
Using these steps, one can quickly build an API endpoint for Apache Kafka using Java Spring Boot.
FAQs:
Q1. Is Kafka a pull-based or push-based message queue?
Kafka is a pull-based message queue system. Consumers actively pull messages from Kafka rather than having messages pushed to them.
Q2. Can there be more than one consumer for a single message in the partition?
This can happen only when those two consumers are from different consumer groups. Kafka partitions maintain an offset for each consumer group rather than for each consumer. Only one consumer within a consumer group can connect with a partition at a time.
Q3. What happens if a message fails to be processed successfully by a consumer?
If a consumer fails to process a message successfully after some retries, that message is sent into DLQ(Dead Letter Queue). One can perform certain operations on the messages present in DLQ.
References:
Refer to the following links for more detailed information and guides:
Explore the GitHub repository for source code and examples to enhance your projects.
With this knowledge, you can integrate Apache Kafka into your application. Code on and conquer!
Very well explained ✨